If you’ve tried to repair a mobile home wall with standard drywall joint compound and watched the patch crack again within a few months — the product wasn’t the problem. The technique was. VOG (Vinyl Over Gypsum) panels are not drywall. They flex with the chassis, they repel standard paint, and they crack for different reasons than site-built walls do.
This guide covers the correct repair for every type of mobile home wall damage — hairline cracks, holes, delaminating vinyl, water damage, and loose batten strips — with the specific products and sequences that actually hold.
In this guide
Why mobile home walls are different — and why standard repairs fail
Most mobile home wall repairs fail not because of bad workmanship but because the homeowner used products designed for site-built homes. Understanding the structural difference explains exactly why.
What VOG panels actually are
VOG stands for Vinyl Over Gypsum. The panel is a 5/16-inch thick gypsum core — significantly thinner than the 1/2-inch or 5/8-inch drywall used in site-built homes — with a decorative vinyl laminate bonded to the face during manufacturing. The vinyl serves as both the finish surface and a moisture-resistant layer. Unlike drywall, VOG panels have square edges rather than tapered ones, meaning standard taping and mudding techniques don’t work at the seams. The vertical joints between panels are covered by plastic batten strips that allow minor panel movement without cracking a rigid seam.
| Feature | Mobile home VOG | Site-built drywall |
|---|---|---|
| Thickness | 5/16 inch | 1/2 or 5/8 inch |
| Surface material | Vinyl laminate (low surface energy) | Paper face (high surface energy) |
| Edge profile | Square / butt joint | Tapered / beveled |
| Seam finishing | Batten strips | Paper/mesh tape + joint compound |
| Wall framing | 2×3 or 2×4 studs, 16–24″ OC | 2×4 or 2×6 studs, 16″ OC |
| Paint adhesion | Requires bonding primer | Standard latex adheres directly |
Why joint compound cracks every time. The steel chassis of a mobile home has a calculated upward curve (camber) that flattens once the home is loaded. As the home settles and the chassis flexes with temperature changes, every rigid repair material — standard joint compound, spackle without elastomeric additives, even rigid caulk — cracks at the seam. The home’s walls move. The repair must move with them.
Why standard paint peels off VOG. Vinyl is a low surface energy material — liquid adhesives, including paint, don’t bond to it at the molecular level without a primer that creates mechanical adhesion. Standard latex paint will appear to stick initially then peel off in sheets within months. There is no shortcut: bonding primer is non-negotiable on every VOG surface. Full paint guide: how to paint mobile home walls without peeling.
Diagnosing your damage — what type is it?
Choosing the right repair starts with an accurate diagnosis. Using the wrong approach for the damage type wastes materials and produces a repair that fails again.
| Damage type | What it looks like | Root cause | Section |
|---|---|---|---|
| Hairline cracks at seams | Fine vertical lines, often where batten strips were | Normal chassis flex or seasonal movement | Cracks |
| Diagonal cracks at door/window corners | 45° crack from corner of frame | Foundation settling — fix leveling first | Cracks |
| Soft or spongy wall | Wall deforms under thumb pressure | Moisture damage to gypsum core | Water damage |
| Holes — small, medium, large | Nail holes to punch-throughs | Impact damage | Holes |
| Bubbles or peeling vinyl surface | Vinyl skin lifting off the gypsum | Adhesive failure from age or heat | Delamination |
| Water stains / discoloration | Brown or yellow staining, often with a tide line | Past or active leak — find source first | Water damage |
| Loose or missing batten strips | Vertical trim piece hanging, cracked, or absent | Age, impact, or removal during renovation | Battens |
The leveling rule: If diagonal cracks appear at door or window frame corners, or if the same seam crack reappears within 6 months of repair, the home likely needs releveling before any wall work. Repairing walls on a home that’s actively settling is wasted effort. Check first: how to level a mobile home.
Fixing hairline cracks and seam cracks
The most important rule in mobile home wall repair: Never use standard joint compound on a VOG seam or expansion crack. It is a rigid mineral compound. As the chassis flexes — which happens with every temperature change — the compound shatters and the crack reappears, often wider than before. Use flexible acrylic sealant only for any seam or movement crack.
For hairline cracks (under 1/4 inch wide)
V-out the crack. Use a utility knife to widen the crack into a shallow V-shape. This creates more surface area for the sealant to bond to and removes loose, crumbling gypsum from the edges. Don’t skip this — applying sealant over a tight hairline crack without opening it produces a repair that peels off.
Scuff the vinyl edges with 220-grit sandpaper. Vinyl is a low-energy surface — sealant needs mechanical adhesion to hold. Lightly scuffing a 1-inch band on each side of the crack gives the product something to grip.
Apply DAP Alex Flex paintable flexible caulk. This is the correct product — it accommodates up to 25% joint movement without cracking. Apply a thin bead into the V-channel, tool flush with a damp finger or putty knife. Do not overfill — a flush surface is easier to paint than a proud one.
Allow to cure 24 hours minimum before painting. Most flexible sealants feel dry in 30–60 minutes but need a full 24 hours for structural cure. Prime with bonding primer and paint as normal after curing.
For cracks wider than 1/4 inch — the hybrid approach
Wider cracks need tensile reinforcement. Use fiberglass mesh tape — never paper tape, which is rigid and will bubble when the chassis moves.
What to use
Fiberglass mesh tape + flexible joint compound (not standard rigid compound). Apply mesh tape over the crack, bed in flexible compound, feather the edges, allow to dry fully, light sand, bonding primer, then paint.
What NOT to use
Paper tape (rigid, bubbles with chassis movement). Standard joint compound alone (cracks again). Any product without paintable flexible formulation. Rigid caulk or silicone (cannot be painted over).
Repairing holes — small, medium, and large
The 5/16-inch thickness of VOG panels means standard drywall patching approaches need modification. A 1/2-inch drywall patch creates a noticeable hump on a VOG wall. Match the thickness or build down the patch — every time.
Fixing delaminating vinyl surface
Delamination — the vinyl skin lifting away from the gypsum core — happens when the factory adhesive breaks down from age, heat exposure, or moisture. The repair approach depends on how large the affected area is and whether the gypsum behind it is still structurally intact.
Small bubbles and lifting edges (under 30% of panel)
Use the adhesive injector method: make a small slit in the bubble, inject vinyl-rated construction adhesive behind the skin, then use a hand roller to press the vinyl back from center outward. Clamp or weight the area for 24 hours while the adhesive cures.
Cost: ~$10 in materials
Large delamination (over 30% of panel)
Full panel replacement is more cost-effective than attempting to re-adhere large sections. Locate the home’s serial number on the HUD data plate (usually inside a closet or behind a cabinet door) and contact the manufacturer for a matching replacement panel.
Most VOG panels are 4×8 or 4×9.5 feet
Full VOG panel replacement — installation steps
Pop off the batten strips flanking the damaged panel using a putty knife — work slowly to avoid splitting them if you want to reuse them
Use a stud finder to locate the 2×3 framing, then score the panel edges with a utility knife before pulling it free
Apply panel adhesive to the studs, set the new VOG panel in place, and secure with 1-1/4 inch finish nails at the edges. Leave a 1/8-inch gap at all edges for expansion
Reinstall batten strips with construction adhesive and color-matched finish nails, or use the board and batten alternative covered in the battens section below
Water-damaged wall repair
⚠️ Critical first step: find and fix the moisture source before touching the wall. Repairing water-damaged VOG without eliminating the moisture source guarantees the new panel fails within months. Check the roof, windows, plumbing, and underbelly for active leaks before starting any wall work. Related: managing moisture in mobile homes.
The moisture assessment — know what you’re dealing with
| Moisture level | Condition | Action required |
|---|---|---|
| 6–12% | Normal / acceptable | No action — monitor only |
| 13–16% | Elevated | Find moisture source, monitor closely |
| 17–25% | Saturated / compromised | Remediation required, inspect for mold |
| Above 25% | Structural failure | Replace panel, inspect studs for rot |
Use the “soft test” first: press firmly with your thumb. A wall that deforms or feels spongy has gypsum that has dissolved — the core has lost all structural integrity and must be replaced. For accurate measurement use a pin-style moisture meter before deciding on approach.
Panel removal and stud treatment
Cut out the damaged panel extending at least 12 inches beyond the visible water stain line — saturated gypsum wicks moisture upward through capillary action, so the visible damage is always smaller than the actual damage
Dry the wall cavity using fans and a dehumidifier until moisture meter readings return to 6–12% before closing the wall. Do not rush this step — closing wet framing creates a mold incubator
If mold is present and under 10 square feet, treat exposed wood studs with a borate-based wood preservative, then prime with Zinsser Bulls Eye 1-2-3 (mold-resistant). If mold exceeds 10 square feet, professional remediation is required
If studs are soft to the touch, “sister” them by attaching new 2×3 or 2×4 lumber alongside the damaged stud before closing the wall. Compromised studs cannot hold a new panel securely
Install new VOG or 1/4-inch gypsum replacement panel as described in the delamination section above
Batten strips: repair, replace, or eliminate
Batten strips exist to cover the expansion gaps between VOG panels — they are not purely decorative. They allow the panels to shift slightly during transport and with chassis movement without cracking a rigid seam. When you paint over them or replace them, you need to understand this function or the fix creates new problems.
Reattaching loose battens
Apply a thin bead of construction adhesive behind the strip, press firmly, then secure with color-matched finish nails — typically 1-inch brads into the stud behind. Do not nail through the center of the batten into the seam gap — you’ll crack the panel edges on both sides.
Replacing damaged battens
Source replacement battens from manufactured home supply specialists — they need to match the vinyl wrap color and profile of your existing strips. Standard batten width is 1-3/4 inches but varies by manufacturer. If you can’t find a match, the board and batten alternative below covers all existing strips permanently.
The board and batten alternative — the 2026 upgrade path
Instead of removing batten strips and trying to mud the seams (which cracks with chassis movement), install decorative vertical MDF or pine strips across the entire wall at regular intervals to create an intentional architectural look. One of the new battens must land directly over each existing VOG seam. This is the most popular mobile home wall transformation in 2026 — it hides every seam permanently and takes the wall from factory to custom in a weekend. Full guide: board and batten accent wall ideas.
Painting repaired walls correctly — the sequence that holds
Every repair in this guide fails if you skip the bonding primer step. This is the single most important technical requirement in the entire process. The full paint protocol for VOG walls is covered in detail at best paint for mobile home walls — below is the core sequence applied to repaired surfaces specifically.
TSP clean the entire wall. Mix 1/2 cup TSP powder per 2 gallons of warm water. Wipe every surface — grease, smoke, and fingerprints prevent primer adhesion. Rinse twice with clean water and allow 4 hours to dry.
220-grit scuff sand the entire surface. This creates mechanical adhesion for the primer on the vinyl surface. Do not skip or substitute with coarser grit — 220-grit roughens without shredding the vinyl laminate.
Apply bonding primer — this step is non-negotiable. Use INSL-X Stix, KILZ Adhesion, or Sherwin-Williams Extreme Bond. Apply with a 1/4-inch microfiber roller on flat surfaces and an angled brush for batten grooves. Allow to dry 4–24 hours depending on humidity before topcoating.
Two coats of high-quality acrylic enamel. Benjamin Moore Advance or Sherwin-Williams Gallery Series level well and hide texture variation between the VOG surface and repair patches. Eggshell or satin sheen — flat paint shows every imperfection and is harder to clean.
Bonding primer comparison (2026)
| Product | Type | Adhesion rating | Best for |
|---|---|---|---|
| INSL-X Stix | Acrylic-urethane | Unparalleled | Best overall for VOG — bonds to PVC and vinyl, cures hard |
| KILZ Adhesion | Modified acrylic | Excellent | Low VOC option, good on glossy surfaces |
| Zinsser Bulls Eye 1-2-3 | Water-based | Good | Mold-resistant — best choice after water damage repair |
| SW Extreme Bond | Acrylic | Superior | Engineered for hard slick surfaces — excellent on laminate |
Painting around batten strips without paint buildup: Use an angled brush to cut into the groove on each side of the batten first — loading the brush lightly to avoid pooling. Follow immediately with a barely-loaded brush to pick up any excess before it dries. A roller then covers the flat wall surfaces. Never roll paint directly into the batten groove — the buildup dries as a visible ridge that’s worse than not painting at all.
Frequently asked questions
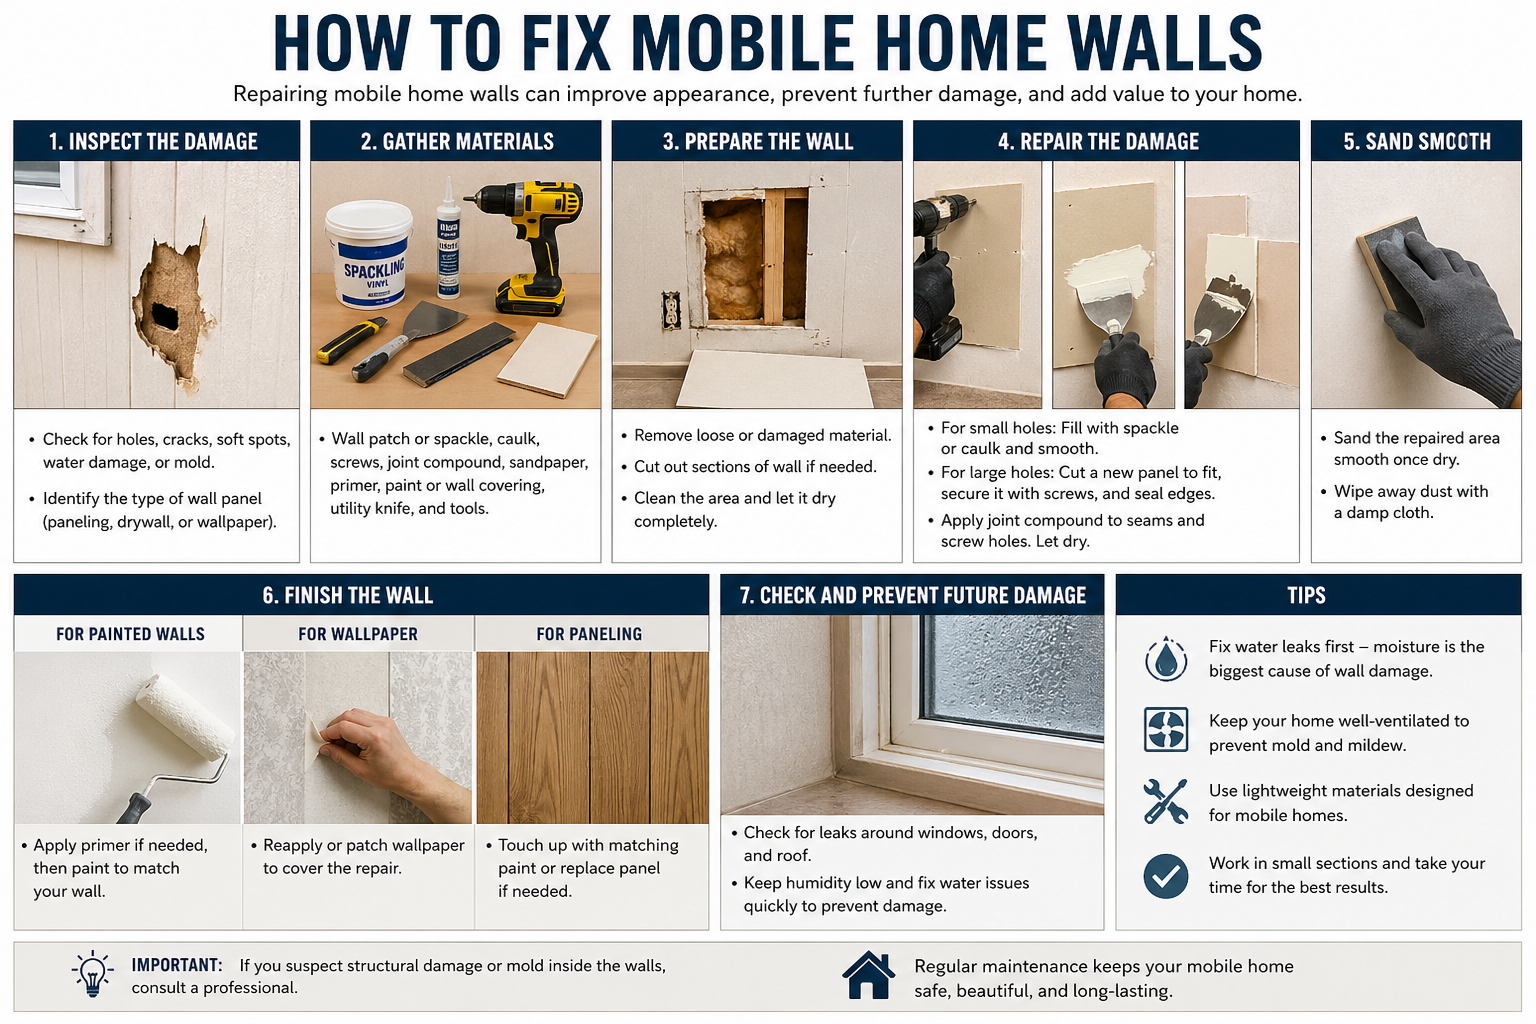
How do you repair mobile home walls?
Start by identifying your wall material — most manufactured homes use 5/16-inch VOG (Vinyl Over Gypsum) panels, not standard drywall. For hairline cracks, use DAP Alex Flex paintable flexible caulk — never rigid joint compound, which re-cracks as the chassis flexes. For holes, use elastomeric spackle on small ones and the modified California patch with thin gypsum board for medium ones. Every repair must be finished with a dedicated bonding primer (INSL-X Stix or KILZ Adhesion) before painting, or the paint will peel off the vinyl surface within months.
What kind of drywall is in a mobile home?
Most manufactured homes use Vinyl Over Gypsum (VOG) panels — approximately 5/16-inch thick with a decorative vinyl laminate bonded to the face. This is significantly different from the 1/2-inch or 5/8-inch paper-faced drywall in site-built homes. VOG has square edges (not tapered), is finished with batten strips at seams rather than tape and mud, and requires bonding primer for any paint or repair product to adhere. Newer manufactured homes (post-2010) sometimes use standard drywall, particularly in higher-end models.
Can you put drywall over mobile home walls?
Yes — installing 1/4-inch or 3/8-inch drywall directly over existing VOG panels is a viable approach called “sandwiching.” It provides a smoother, more traditional finish and avoids the mess of VOG removal. The drawbacks are added weight to the home and the need to extend all electrical outlet boxes to account for the added wall thickness. For a comprehensive update of your mobile home interior alongside this work, see our mobile home remodel ideas guide.
How do you fix a hole in a mobile home wall?
Small holes under 1/2 inch are filled with elastomeric spackle, sanded flush when dry, then primed with bonding primer before painting. Medium holes between 1/2 inch and 3 inches use a modified California patch with 1/4-inch gypsum board — standard 1/2-inch drywall creates a hump on thin VOG walls. Large holes over 3 inches require wood backer strips inserted through the hole and screwed to the existing panel, then a gypsum patch secured to the backer, fiberglass mesh tape at the seams, and flexible compound. Every hole repair requires bonding primer before painting.
Why do mobile home walls crack?
The primary cause is chassis flex — the steel I-beam frame moves with ground settling, temperature changes, and seasonal soil moisture variation. Because gypsum is brittle and can’t flex, the panels crack at their weakest points: seams and the corners of door and window frames. Humidity and temperature differentials also cause the vinyl laminate and gypsum core to expand and contract at different rates, stressing the factory adhesive bond. If diagonal cracks appear at door frame corners and doors begin sticking, the home likely needs releveling — see our leveling guide.
Can you use regular joint compound on mobile home walls?
Not for seams or any area subject to movement — it will crack again as the chassis flexes. For large hole repairs where movement isn’t a factor (the center of a panel away from seams), setting-type compound like Durabond 45 is acceptable as the first coat because it shrinks less than standard joint compound. But for any seam, expansion crack, or area near windows and doors, use DAP Alex Flex paintable flexible caulk instead. And on VOG, every compound application must be primed with bonding primer before topcoating.
How do you update old mobile home walls?
The highest-impact update is a complete repaint using the correct bonding primer sequence (TSP clean → INSL-X Stix primer → two coats of acrylic enamel). This transforms the appearance more than any other single change. Beyond paint, the board and batten treatment — installing decorative vertical strips over the existing batten strips — eliminates the manufactured look entirely and creates a custom architectural finish. For the complete board and batten installation guide: board and batten accent wall ideas.
More mobile home repair and upgrade guides
Wall repairs last longest when the chassis is level and the home’s moisture is under control. If cracks keep returning, address those foundations before the next cosmetic repair.


2 comments