A mobile home pipe freezes at 28°F sustained for just 4 hours. A site-built home with a foundation might survive 20°F for twice as long. The reason is the exposed underbelly — your plumbing runs beneath the subfloor in an unheated cavity that equilibrates with outside air temperature within hours. The interior might be 70°F while the pipes underneath are at 30°F.
This checklist covers everything: exterior skirting and belly wrap, heat tape installation, interior pipe protection, heating system prep, and the complete drain-down procedure for vacant homes. Work through it before the first freeze.
In this guide
Why mobile homes freeze faster than site-built homes

Understanding why manufactured homes are more vulnerable than site-built homes determines every decision in this guide. This isn’t just about adding more insulation — it’s about the specific structural engineering that makes the threat different.
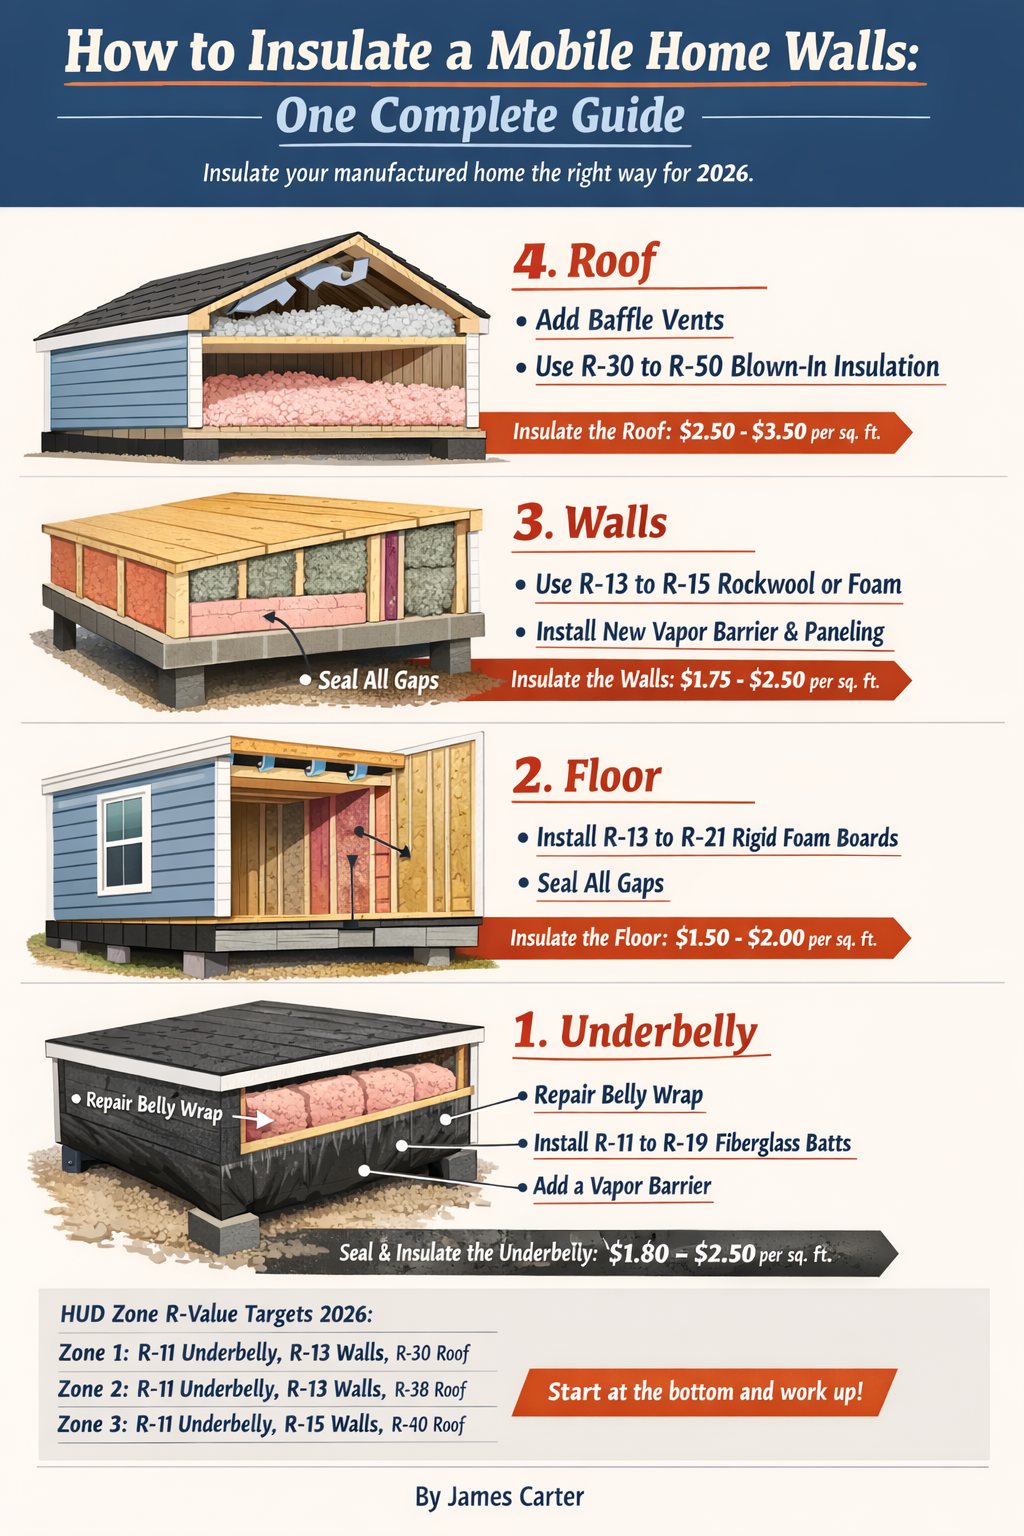
The exposed underbelly problem. In a site-built home, plumbing runs through conditioned interior walls or a heated basement. In a manufactured home, all supply lines run through the belly cavity — a space between the subfloor and the belly wrap that faces open crawl space air. The temperature differential can reach 40°F: interior at 70°F, pipes at 30°F. The insulation in this cavity is often compressed or settled, reducing its effective R-value far below its rated spec. Full insulation context: how to insulate a mobile home.
Skirting gaps amplify the problem. Even a 5-mph breeze through skirting gaps strips away the stagnant air layer that provides a minor insulating buffer for the belly. This wind-chill effect inside the crawl space is why pipes can freeze at 28°F when a site-built home’s pipes survive 20°F with no intervention. Any gap over 1/4 inch is a serious vulnerability.
Steel chassis thermal bridging. The steel I-beam chassis conducts cold far more efficiently than wood framing. In winter, the chassis draws heat out of the floor assembly, lowering floor joist temperatures to the point where condensation forms on the underside of the subfloor. This is a structural rot risk over multiple seasons, not just a comfort problem. Releveling after frost heave is covered in our mobile home leveling guide.
Thin wall construction. Older manufactured homes use 2×3 or 2×4 studs — R-7 to R-11 walls versus R-21 in modern site-built homes. An older unit loses heat through its walls at approximately three times the rate of a comparable site-built home. This forces the furnace to cycle more frequently and makes every air leak proportionally more damaging.
| Housing type | Wall framing | Typical R-value | Pipe freeze threshold |
|---|---|---|---|
| Standard site-built | 2×6 studs | R-21 | ~20°F for 6+ hours |
| Modern manufactured (2020+) | 2×6 studs | R-19 to R-21 | ~28°F for 4 hours |
| Older manufactured (pre-2000) | 2×3 or 2×4 studs | R-7 to R-11 | 28°F for 4 hours — act immediately |
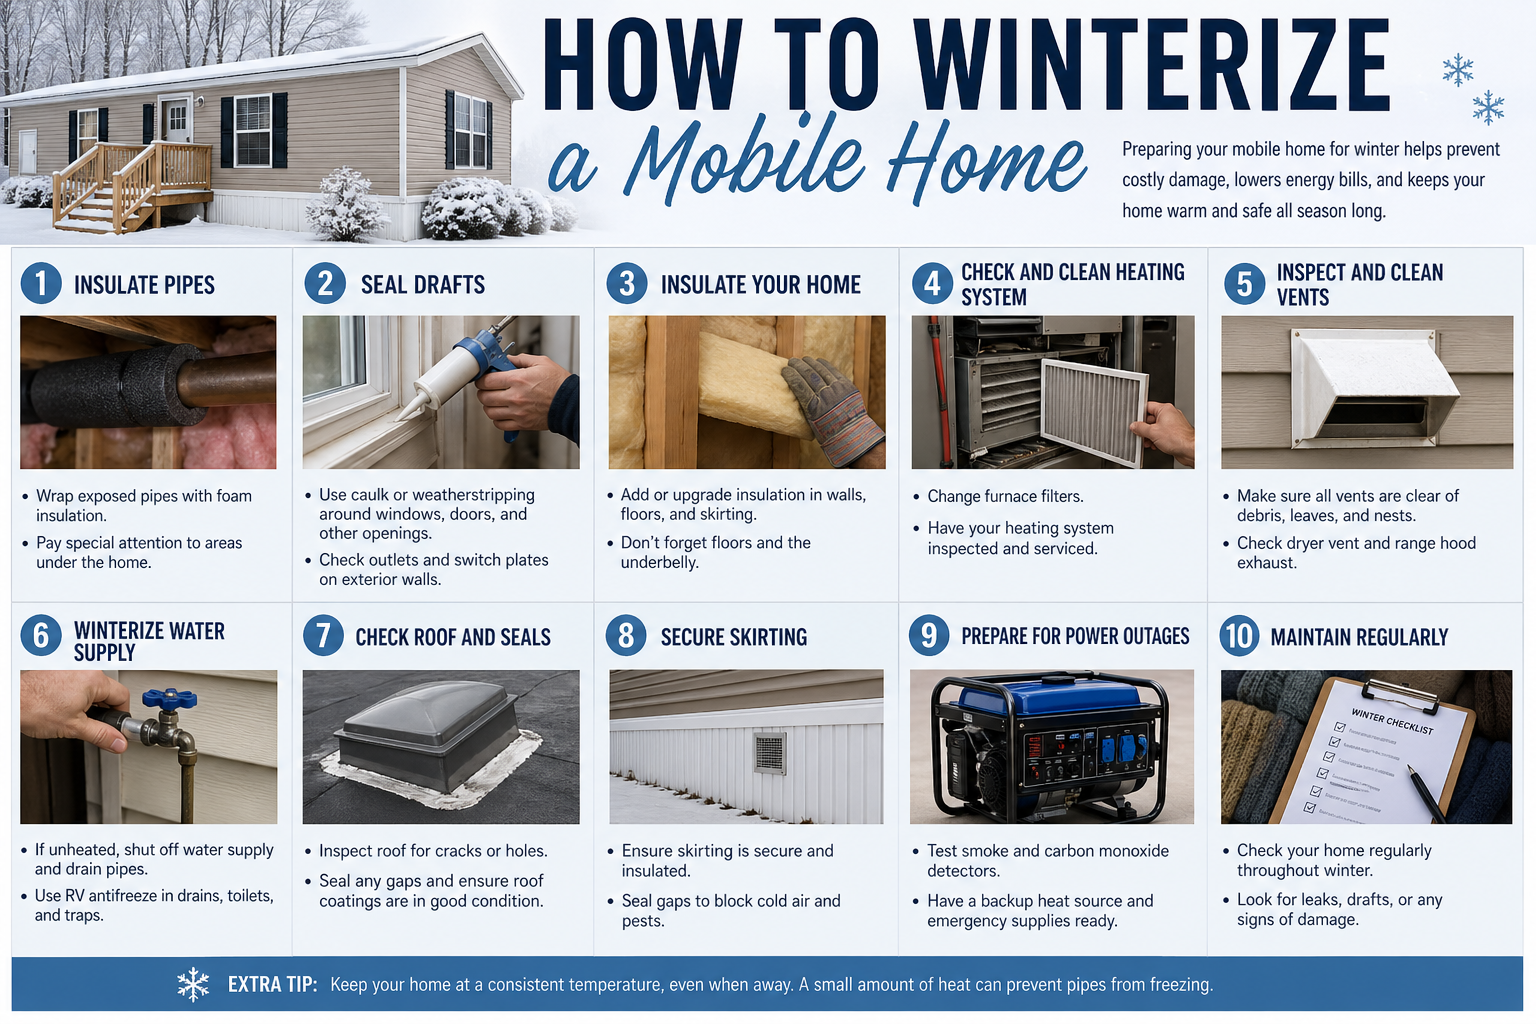
Exterior winterization checklist
The goal of exterior winterization is to create a still air pocket beneath the home. Moving air destroys insulation performance. Stagnant air provides passive protection. Every gap, tear, or loose panel works against this goal.
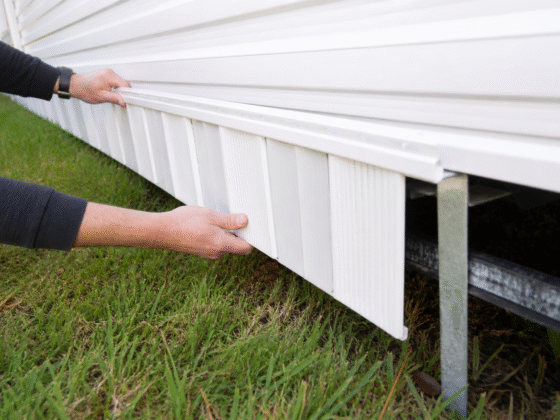
1. Skirting inspection and sealing
Walk the full perimeter and find every gap over 1/4 inch — these are the danger points for convective air intrusion into the belly cavity. Look for buckled panels, bottom-rail gaps, corner separations, and utility entry points (water inlet, electrical conduit).
Temporary fix: Cut 2-inch XPS foam board to fit gaps and hold in place with construction adhesive. Takes 30 minutes per section. Permanent fix: Replace failed panels with insulated vinyl foam-backed skirting.
| Skirting material | 2026 cost/linear ft | R-value | Best for |
|---|---|---|---|
| Standard vinyl | $4–$6 | R-0.5 | Zone 1 mild climates only |
| Insulated vinyl (foam-backed) | $10–$15 | R-2 to R-4 | Best value for Zone 2/3 |
| Faux stone/brick fiberglass | $7–$12 | R-1 | Curb appeal priority |
| DURASKIRT™ PRO (concrete) | $35–$45 | R-1.5 | Permanent foundation look, sloped lots |
2. Belly wrap inspection and repair
Crawl under the home with a flashlight and look for sagging sections of the black polyethylene belly material. Any sag means the insulation inside has fallen away from that section, leaving pipes and ducts exposed. Also check for rodent entry points — small holes destroy much more than their size suggests because mice tunnel through insulation batts.
Use Flex-Mend tape only — never duct tape or standard flashing tape, which fail within 1–2 seasons in the dusty, thermally-cycling crawl space environment. Clean the area with a dry cloth, replace any missing insulation with R-19 fiberglass batts, then apply Flex-Mend with at least 2 inches of overlap on all sides.
| Flex-Mend product | 2026 price | Best use |
|---|---|---|
| 4″ × 180′ roll | $43.39 | Sealing seams and small punctures |
| 28″ × 25′ roll | $63.99 | Large patches or rodent damage |
| 48″ × 14′ kit | $34.99 | Comprehensive belly overhaul |
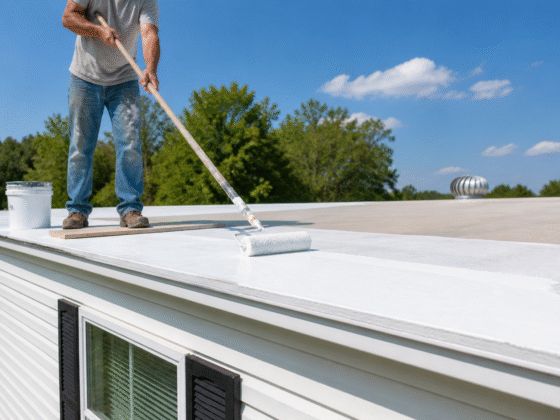
3. Gutters, downspouts, and anchor straps
Clean gutters before first freeze. Clogged gutters cause roof ponding under snow loads. Downspout extensions must carry discharge at least 4–6 feet away from skirting — water pooling at the base saturates the soil around pier footings, which then freezes, heaves, and shifts the home out of level.
Check anchor strap tension. The expansion and contraction of the steel chassis during temperature swings loosens anchor straps over time. A loose strap reduces wind resistance during winter storms. An over-tight strap puts undue stress on the chassis. Check before winter and after the first major cold snap.
Heat tape installation: the most critical active protection
Heat tape (pipe freeze cable) is mandatory active protection for the main water inlet and any exposed supply runs in the belly cavity. In 2026 the technical standard is self-regulating tape, not constant-wattage tape.
✓ Self-regulating tape (buy this)
Contains a conductive polymer core that increases resistance as it warms — effectively turns itself down when not needed. Cannot overheat. Safe on PEX and CPVC. More expensive upfront, dramatically lower running cost.
⚠️ Constant-wattage tape (avoid)
Remains at a fixed temperature regardless of pipe temperature. If the thermostat fails, it can melt plastic PEX pipes. Higher electricity cost. Only use if self-regulating is unavailable in your length.
| Product | Length | 2026 price | Key feature |
|---|---|---|---|
| Frost King HC6A | 6 ft | $18.50 | Built-in thermostat, power indicator light |
| Frost King HC30A | 30 ft | $36.75 | 300W, automatic thermostat — best for main inlet run |
| EasyHeat Freeze Free | 12 ft | $28.95 | Cut-to-length options, self-regulating |
Step-by-step heat tape installation on PEX/CPVC
Clean the pipe. Wipe the PEX or CPVC line with rubbing alcohol to remove any oily factory residue. Heat tape adhesive needs a clean surface to maintain contact.
Wrap in aluminum foil. PEX is an excellent insulator — it takes longer for heat to reach the water inside. A layer of heavy-duty aluminum foil around the pipe acts as a heat spreader, distributing warmth evenly and preventing localized hot spots.
Run cable in a straight line along the bottom of horizontal pipes. Heat rises — positioning on the bottom maximizes effective heat transfer upward through the pipe. Secure every 12 inches with electrical tape or fiberglass-reinforced tape. Never overlap heat tape — overlapping creates a localized heat spike that can cause the cable to fail or ignite.
Position the thermostat block against the pipe. Press the thermostat firmly against the pipe surface. Do not cover it with heat tape — it needs to sense the pipe temperature directly to cycle correctly.
Cover with closed-cell foam pipe sleeves. Install 1/2-inch thick foam insulation over the entire heat tape assembly. This retains the heat against the pipe rather than letting it radiate into the crawl space air.
Plug into a GFCI outlet only. Never run heat tape on an extension cord. The outlet under the home must be a dedicated GFCI outlet — standard outlets in wet crawl spaces are a fire and electrocution hazard.
Interior winterization checklist
The cabinet door trick — zero cost, 10–15°F protection
FREEOn nights below 20°F, leave under-sink cabinet doors open. The physics: warm, buoyant air from the living area flows into the cabinet space, while cooler, denser air sinks toward the floor. This natural convective exchange keeps under-sink pipes 10–15°F warmer than a closed cabinet. Supply lines that penetrate the floor in cabinet corners are the most common indoor freeze point — this simple act addresses them at zero cost.
Dripping faucets — pressure relief, not just flow
Below 20°FDripping faucets are widely misunderstood as “keeping water moving.” The primary benefit is actually pressure relief. When ice forms in a pipe and the faucet is closed, the pressure between the ice and the closed valve can reach thousands of PSI — bursting the pipe. A pencil-width stream provides an exit path for this pressure. Drip both hot and cold lines — hot water pipes burst more often because the heating process removes dissolved air bubbles that would otherwise cushion expanding ice.
Weatherstripping replacement
$8–$25 per doorManufactured home door frames are frequently out-of-square from chassis settling. Standard foam tape creates a seal on one side while leaving a gap on the other. Use V-Strip (tension seal) for the top and sides — it adapts to varying gap widths. Foam tape only works on perfectly square frames and fails with repeated friction within one season. Full sealing context: addressing mobile home wall and seal issues.
Door sweep installation
$12–$25Install a Duck Brand aluminum-backed vinyl sweep on the interior bottom of all exterior doors. Mobile home exterior doors are typically 32 or 36 inches wide — confirm before ordering. Install with screws rather than adhesive — the sweep drags against carpet when the home shifts slightly, and adhesive-only installs pull loose within one season.
Window film insulation kits (3M Indoor, Duck Max Strength)
$15–$30 per kitSingle-pane aluminum windows have an R-value of approximately 1.0. Window film creates a 1/2″ to 3/4″ dead-air pocket between the glass and film — reducing heat loss by 20–30%. Installation critical step: use a high-heat hair dryer to fully shrink the film after applying. A loose, billowing film eliminates the dead-air layer and provides almost no benefit. Clean frames with rubbing alcohol before applying the double-sided tape.
Heating system preparation
Furnace filter: the MERV rating trap
Mobile home air handlers (typically Revolv or Coleman) use smaller blowers with lower static pressure limits than site-built systems. High-MERV filters that work in a site-built home can choke airflow in a manufactured home — cracking heat exchangers and dramatically reducing efficiency.
| MERV rating | Particle efficiency | Mobile home verdict |
|---|---|---|
| MERV 1–4 | Basic (dust/pollen) | Safe but minimal filtration |
| MERV 8 | Standard residential | ✓ Gold standard for mobile homes — replace monthly in winter |
| MERV 11 | Superior | Acceptable only for post-2020 high-static units |
| MERV 13+ | Hospital grade | ❌ Dangerous — chokes airflow, can crack heat exchangers |
Duct leak detection and sealing
Manufactured home ducts run under the floor in the belly cavity — not in a conditioned attic. A duct leak doesn’t just waste energy: it pulls cold, damp air from the crawl space directly into your living area. The most common leak locations are the boot-to-floor connection, the crossover duct on double wides (frequently damaged by animals), and the trunk end-caps.
The smoke pencil test
With the furnace fan running, hold a smoke pencil near floor registers and accessible duct joints. If smoke is violently sucked in or blown away, a leak is present at that joint. Mark all leak points before sealing.
Mastic sealant — not duct tape
Standard duct tape uses rubber-based adhesive that dries out and fails within 1–2 heating seasons. Mastic sealant (water-based compound) is painted onto joints and hardens into a flexible, permanent seal that withstands 160°F plenum temperatures for decades.
Space heater warning: Mobile homes are tight structures with limited fresh air exchange. Unvented propane or kerosene heaters produce carbon monoxide in dangerous concentrations quickly. Only use electric space heaters with tip-over automatic shutoff. Maintain at least 3 feet of clearance from all combustibles — the thin wood floors and walls of manufactured homes ignite faster than site-built construction.
Pipe freeze prevention and emergency response
⚠️ Act at 28°F — 4 hours sustained
This is your action threshold. Below 28°F sustained for 4 hours, manufactured home pipes in a compromised belly are actively at risk. Do not wait for the temperature to drop further. If your forecast shows an overnight low of 25°F, act the afternoon before.
The Freeze Miser thermostatically controlled valve
For exterior faucets or areas without reliable power for heat tape, a Freeze Miser valve ($15–$25) provides fully mechanical protection. Screw it onto the faucet end. A wax actuator inside contracts when the water inside drops to 35°F, opening the valve and allowing a small amount of water to bleed. As warmer water enters, the wax expands and closes it. No electricity required, saves thousands of gallons compared to a constantly dripping faucet.
If a pipe freezes: the correct emergency response
Open the affected faucet fully first — this provides pressure relief and an exit path as the ice thaws
Apply heat starting from the faucet end and working back toward the frozen section — this ensures thawed water can exit rather than being trapped between two ice plugs
Use a hair dryer only — never an open flame. The belly wrap and dry floor joists are highly flammable. A blowtorch is a leading cause of manufactured home structure fires during winter
Know your main shutoff location before winter. In a manufactured home, the main water shutoff is typically at the water inlet pipe where it enters the home from the ground — look near the water heater or a utility closet. If a pipe bursts, you need to reach it in seconds
Winterizing a vacant mobile home: the full drain-down procedure
For a home that will be unoccupied during winter, the only 100% effective freeze protection is removing the water entirely. This also affects your home insurance coverage — check your policy: what homeowners insurance doesn’t cover often includes freeze damage in unoccupied homes.
Close the main water shutoff at the ground source or inlet pipe.
Deactivate the water heater. Switch off the circuit breaker for electric heaters. For gas heaters, turn the gas valve to the pilot position — do not leave it on full.
Open every faucet in the house — kitchen, all bathrooms, shower, and exterior hydrant. This breaks the vacuum and allows water to drain toward the low points.
Open the low-point drain valves underneath the home — usually near the water heater or kitchen. Allow water to drain completely into the soil.
Drain the water heater. Connect a hose to the drain valve at the bottom, open the pressure relief valve at the top, and route water outside. Allow the tank to empty completely.
Compressed air blowout at 30 PSI. Use an RV blow-out plug ($10) at the city water inlet. Set the compressor to exactly 30 PSI — higher pressure can shatter plastic fittings. Open one faucet at a time starting from the kitchen, then bathrooms, then shower. When only air blows from a tap, close it and move to the next. Do not forget the toilet flush valve.
P-trap antifreeze: propylene glycol only
✓ Propylene glycol (pink / RV antifreeze)
Non-toxic, safe for septic systems, does not degrade plastic pipes. Pour 1 cup into each sink drain and 2 cups into the toilet bowl after flushing to empty the tank. The only correct choice.
❌ Ethylene glycol (green or blue / automotive)
Toxic to pets and humans. Degrades the seals and fittings in manufactured home plumbing. Never use in any drain or P-trap in a home.
Thermostat setting for vacancy: If the water lines are fully drained and antifreeze is in the P-traps, heat can be turned off completely. If water remains in the lines, set the thermostat to a minimum of 55°F — never lower. Vacant unheated homes also develop significant condensation damage; leave large buckets of desiccant or a battery-powered dehumidifier running to protect finishes and flooring. See our dehumidifier guide for sizing.
Frequently asked questions
At what temperature should I worry about pipes freezing in a mobile home?
The critical threshold is 28°F sustained for 4 hours. This is significantly warmer than site-built homes because the belly cavity equilibrates quickly with outdoor air temperature — especially if skirting gaps allow air movement through the crawl space. If the forecast shows an overnight low of 25°F or below, act before sundown the same day: open cabinet doors, verify heat tape is functioning, and confirm skirting gaps are sealed.
How do I keep my mobile home warm in winter cheaply?
The four highest-impact budget moves in order of cost: window film kits ($20–$30 per window, 20–30% heat loss reduction through glass); V-strip weatherstripping on door frames ($15 per door, stops drafts immediately); the cabinet door trick (free, keeps under-sink pipes 10–15°F warmer); and sealing skirting gaps with XPS foam board ($30–$60 of materials). Together these four changes cost under $200 and address the most significant heat loss points in any manufactured home.
Should I leave my faucets dripping in a mobile home?
Yes — but only as a secondary defense during extreme events below 20°F, or when your heat tape is not functioning. If your skirting is sealed and your heat tape is working, dripping is less critical. When you do drip, maintain a pencil-width stream (not just drops) and run both hot and cold lines. The primary purpose is pressure relief — providing an exit path for ice expansion pressure that would otherwise burst the pipe.
How do I winterize a mobile home that will be vacant?
The gold standard is a full drain-down and compressed air blowout. Close the main shutoff, drain the water heater, open all faucets and low-point drains, then use a $10 RV blow-out plug at 30 PSI to clear all remaining water from the lines. Pour propylene glycol (pink RV antifreeze — never automotive) into every P-trap. If lines are fully drained, heat can be turned off. If any water remains in the system, maintain a minimum of 55°F.
What is the best skirting for winter in a mobile home?
Insulated foam-backed vinyl provides the best cost-to-performance ratio at $10–$15 per linear foot with R-2 to R-4 value. DURASKIRT™ PRO concrete panels are the premium permanent option at $35–$45 per linear foot, particularly effective for sloped lots requiring custom cutting. For a quick-fix this season, cutting 2-inch XPS foam board to fill gaps behind existing vinyl panels costs a fraction of full replacement and dramatically reduces air infiltration.
How much does it cost to winterize a mobile home?
A standard DIY exterior and interior package — heat tape, Flex-Mend belly repair, window film, weatherstripping, and a furnace filter — typically costs $150–$300. Adding insulated skirting for a full perimeter runs $800–$2,000 DIY. Professional skirting replacement or duct sealing projects range from $1,500–$4,500. The drain-down procedure for a vacant home costs under $50 in materials (RV antifreeze and an RV blow-out plug).
Can pipes freeze in a mobile home even with the heat on?
Yes — absolutely. If the belly wrap is torn and cold air is hitting a specific pipe, that pipe can freeze even if the room above is 75°F. The interior temperature and the belly cavity temperature are effectively independent systems when the belly wrap is compromised. This is why active heat tape and passive belly integrity are both required — neither alone provides reliable protection in severe cold.
More mobile home maintenance guides
Winterization works best when your foundation is level and your insulation envelope is intact. If you haven’t checked those this year, tackle them alongside this checklist.


1 comment