Skirting is not just cosmetic. It is the barrier between your home’s pipes, wiring, and insulation and the outside world. Without it, wind chill under the home drives up your heating bills, pests move into your crawlspace, and moisture from the ground rots your floor joists from below. Most park managers require it — and HUD federal code mandates specific ventilation standards when it’s installed.
The good news: vinyl skirting — the most common type — is a genuine weekend DIY project. One person can skirt a single-wide in a day. A double-wide takes a weekend. The tools are affordable, the materials are available at most home improvement stores, and the installation sequence is straightforward once you understand a few critical rules that most guides leave out.
This guide covers everything: material selection, how to measure correctly on sloped lots, step-by-step installation, the HUD ventilation math you must get right, and the mistakes that cause skirting to blow out, buckle, or let pests in.
Choosing the Right Mobile Home Skirting Material
The material you choose determines how long your skirting lasts, how much maintenance it needs, and how well it protects against pests and weather. Here’s the honest breakdown of every option:
Vinyl
Industry standard for DIY. Lightweight, easy to cut, snap-lock installation. Best for most homeowners.
Metal / Steel
29-gauge steel or aluminum. Wind and pest resistant. Strong Skirt™ rated to 100 mph. Best for high-wind zones.
Concrete
Maximum durability. Pest-proof, fire-resistant. Meets FHA/VA loan standards. Requires two people or a pro.
Faux Stone
High-density polymer panels that mimic real stone. Superior curb appeal, moisture-resistant. Great for resale.
Wood
Pressure-treated timber or plywood. High maintenance, prone to rot and pests. Avoid unless budget is extreme.
| Material | DIY Difficulty | Pest Resistance | Wind Resistance | Lifespan |
|---|---|---|---|---|
| Vinyl | Easy ✅ | Fair — rodents can chew through | Moderate — needs proper snap-lock | 10–20 years |
| Metal / Steel | Moderate | Good — hard to chew or burrow | Excellent — rated to 100 mph | 20–40 years |
| Concrete | Hard | Excellent — completely pest-proof | Excellent | Permanent |
| Faux Stone | Moderate | Good | Good | 15–25 years |
| Wood | Moderate | Poor — attracts termites | Poor | 5–10 years |
Tools & Materials Checklist
Three tools make or break a skirting installation. The snap-lock punch is the most important — without it your panels won’t lock into the rails properly and will blow out in wind. Don’t skip it.
| Item | Why You Need It | Get It Here |
|---|---|---|
| PacTool Snap-Lock Punch | Creates locking tabs on cut panel edges so they hook into the top rail. The single most critical specialized tool — without it panels blow out. | 🛒 Amazon |
| Aviation Snips | Precision cutting of vinyl and metal panels. Far cleaner cuts than a utility knife — prevents panel cracking. | 🛒 Amazon |
| 6-Mil Polyethylene Vapor Barrier | Ground moisture barrier — lays under entire crawlspace. Required by HUD 24 CFR § 3285.203. Also reduces ventilation requirement from 1:150 to 1:1,500. | 🛒 Amazon |
| Mobile Home Vinyl Skirting Kit | Includes panels, top rail, bottom track, and corner pieces. Measure your perimeter before ordering. | 🛒 Amazon |
| Galvanized Ground Spikes | Secure bottom rail to earth every 19 inches. Galvanized prevents rust in damp soil conditions. | 🛒 Amazon |
| Chalk line + line level | Snapping a perfectly straight line for the top back rail — the foundation of a professional finish | Any hardware store |
| Tape measure | Measuring perimeter AND height every 16 inches on sloped lots | Any hardware store |
| Circular saw + fine-toothed blade (reversed) | Long straight cuts on panels. Install the blade backwards — this is the trick that prevents shattering PVC | Any hardware store |
| Drill + screwdriver bits | Attaching top back rail to the home’s rim joist or siding | Any hardware store |
| Treated 2×2 or 2×4 lumber | Mounting the bottom rail off the ground on uneven or sloped sites — prevents settling | Any hardware store |
| Nylon string + stakes | Keeping the bottom rail line perfectly straight between corners | Any hardware store |
How to Measure Correctly for Mobile Home Skirting
Measurement errors are the #1 reason DIYers end up making a second trip to the store. The perimeter is simple — the height is where it gets tricky, especially on sloped lots.
Step 1: Measure the Perimeter
Walk the entire exterior of your home and measure all four sides. Add them together for your total linear footage. This tells you how much top rail, bottom track, and how many panels you need.
Step 2: The 16-Inch Height Survey
This is what separates a professional-looking installation from one that looks uneven. Don’t just measure height at the corners.
- Measure from the ground up to the bottom edge of your home’s siding every 16 inches around the entire perimeter
- Write down every measurement — on a sloped lot these will all be different
- The tallest measurement determines the panel height you need to order
- On sloped lots, each panel will be cut individually to match the ground at that specific point
Step 3: Calculate Total Material
The 10% buffer accounts for cutting waste, corner pieces, and angled cuts on uneven terrain. Always round up to the nearest full panel. It’s far better to have two panels left over than to run short mid-installation.
Site Preparation — Don’t Skip This
The most common reason skirting fails within 2–3 years isn’t the installation — it’s skipped site preparation. Federal regulation 24 CFR § 3285.203 requires site prep for a reason: without it, moisture builds up under the home and destroys your floor joists, insulation, and subfloor from below.
Ground Preparation
- Remove all vegetation — grass, weeds, stumps, and roots to a depth of at least 12 inches below final grade. Decomposing organic matter attracts pests and retains moisture.
- Grade the ground — slope must fall away from the home at a minimum of 1/2 inch per foot for the first 10 feet. Water must drain away, not pool under the home.
- Remove rocks and debris that could puncture the vapor barrier
Install the 6-Mil Vapor Barrier — This Is Critical
Lay the polyethylene vapor barrier across the entire crawlspace ground before installing skirting. This single step:
- Prevents ground moisture from rising into the crawlspace — the #1 cause of floor joist rot
- Reduces your required ventilation area from 1 sq ft per 150 sq ft to 1 sq ft per 1,500 sq ft — meaning you need 90% fewer vents, which reduces cost significantly
- Deters pests by eliminating the damp soil environment they prefer
- Is required by HUD code for manufactured housing sites
Overlap seams by at least 12 inches and seal with tape. Weight the edges with rocks or stakes until the skirting is installed to hold it in place.
How to Install Mobile Home Skirting: Step-by-Step
This guide covers vinyl skirting — the most common DIY material. The sequence below applies to most snap-lock vinyl systems including EverLock and similar kits. Always read your specific kit’s instructions alongside this guide.
Mount the Top Back Rail
The top back rail is the structural spine of your entire installation. If this isn’t straight and level, nothing else will be.
- Snap a chalk line around the entire perimeter of the home just below the bottom edge of the siding
- Attach the top back rail along this chalk line using screws into the rim joist or siding — one fastener every 16 inches
- Critical: Place screws in the center of the pre-punched slots — not at the edges. Leave 1/16″ clearance from the rail surface. This allows the rail to expand and contract with temperature without buckling
- At corners, cut the bottom curved leg of the rail at a 45-degree angle and slit vertically 1 inch to allow it to bend cleanly around the corner
- Where two rail sections meet, overlap them by 1 inch for a continuous seal
Set the Bottom Track
- Use a plumb bob or level to mark the ground directly below the outer edge of each corner of the home
- Stretch a nylon string between corner stakes to give you a straight guide line for the bottom track
- On dirt: Drive galvanized ground spikes through the bottom track every 19 inches to anchor it to the earth
- On concrete slabs: Use 3/4-inch masonry nails or 3/16-inch molly screws every 19 inches
- On uneven or sloped ground: Mount the bottom track on treated 2×2 or 2×4 lumber instead of directly on soil. This prevents settling and keeps the track level despite ground irregularities
Cut Your Panels to Height
This is where your 16-inch height survey from the measuring step pays off. Each panel may be a different height on a sloped lot.
- Start 24 inches away from your lowest corner
- Measure from the ground up to 1.5 inches above the bottom edge of the top back rail — this is your cut height for that panel
- In freezing climates with frozen ground: Increase this measurement to 3 inches to allow for frost heave — frozen ground expands upward and will buckle panels that are cut too tight
- To cut vinyl without shattering: Use aviation snips for short cuts, or a circular saw with a fine-toothed blade installed backwards for long straight cuts. The reversed blade cuts on the downstroke and produces a clean edge without cracking the PVC
- After cutting, use the snap-lock punch tool every 4 inches along the top and bottom cut edges to create the locking tabs. Without these tabs, the panel won’t hook into the rails and will pop out in wind
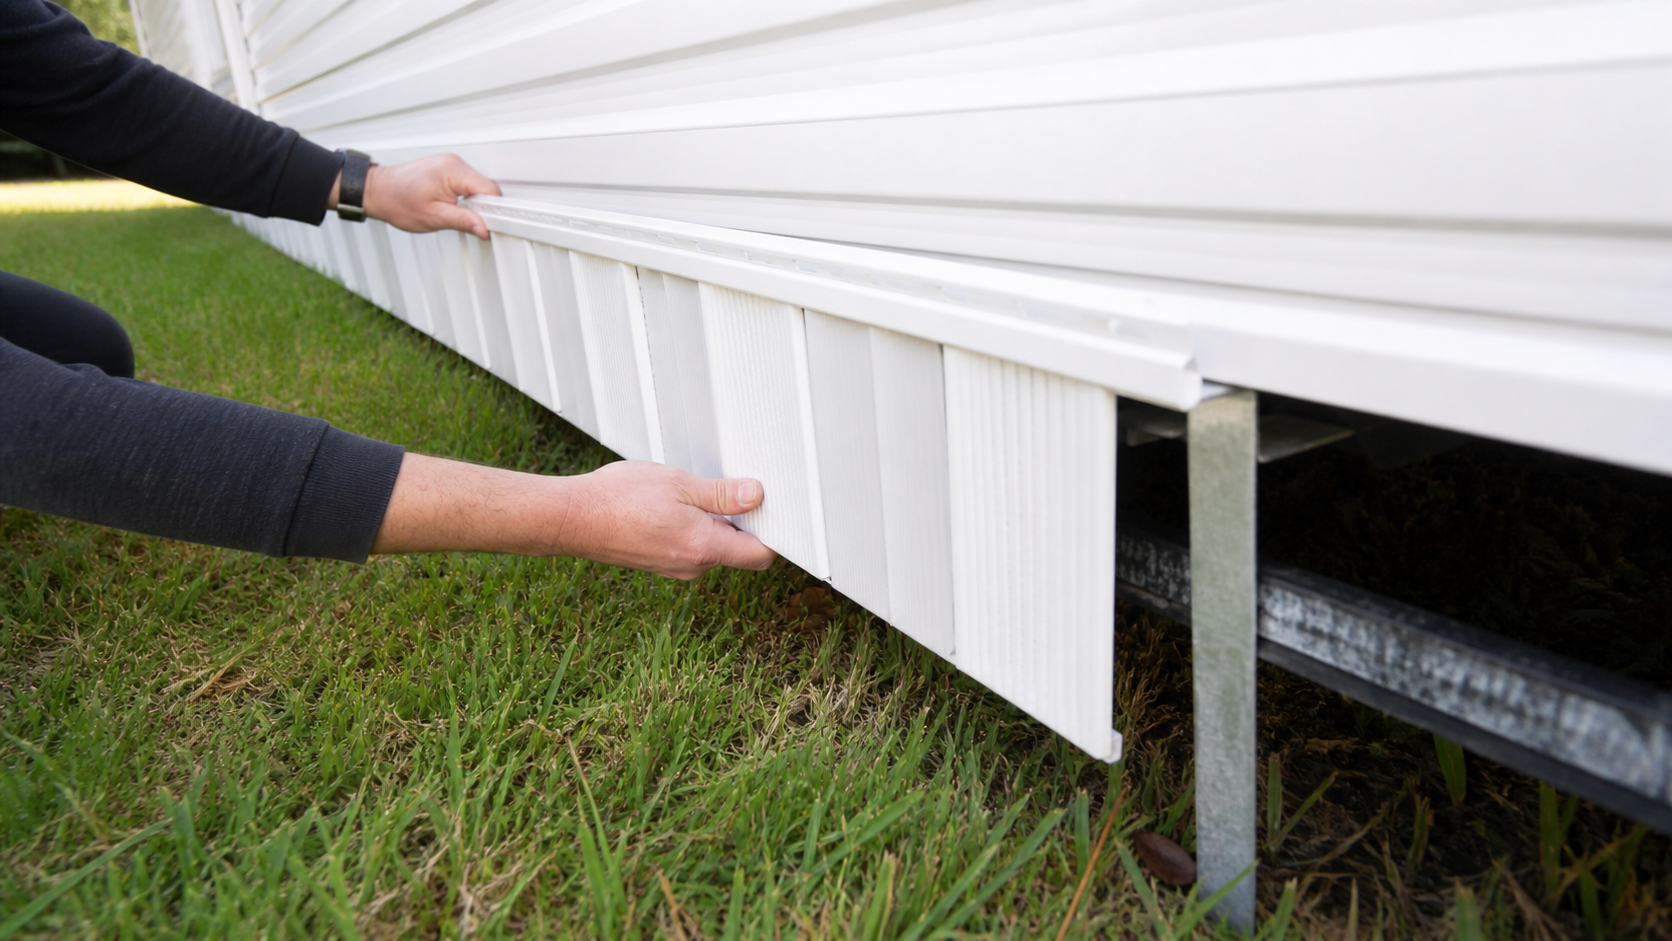
Insert and Interlock Panels
- Insert the bottom of the panel into the bottom track first, then tilt it upward until the punched top edge hooks into the top back rail
- Slide the panel sideways to interlock with the previous panel’s edge hook — you’ll feel it click into place
- Work in one direction around the home, completing sections of approximately 12 feet before moving on
- At corners: Cut the corner panel to height, then bend it over a table edge at a uniform angle to match the corner of the home. Insert it into the corner bend of the rails
- Install vent panels at the required intervals as you go — do not leave vents for last (see HUD requirements in the next section)
Lock the Top Front Rail and Finish
- Once a section of panels is fully inserted, push the top front rail upward until it interlocks with the top back rail — it sandwiches the panel tops securely between the two rails
- Rail sections should overlap by 1 inch at joints for a continuous weather seal
- Install the access panel in a location near your water shutoff and electrical hookups — HUD requires at least one access opening (see requirements below)
- Walk the perimeter and check every panel — push on each one to confirm it’s locked top and bottom
- Check all corners for gaps — apply exterior caulk to any gaps where panels meet at inside corners
HUD Ventilation & Access Requirements — Federal Code
This is the section most DIY guides skip — and it’s the one that can cause real problems. Improper ventilation under a mobile home traps moisture, allows dangerous gas buildup, and can invalidate your homeowner’s insurance. HUD Standard 3285.505 is federal law, not a suggestion.
📋 HUD 3285.505 — What You Must Know
1 sq ft of net free vent area for every 150 sq ft of home floor area — if no vapor barrier installed
Drops to 1 sq ft per 1,500 sq ft when full vapor barrier is installed — 90% fewer vents needed
Vents must be on at least two opposite sides for cross-ventilation. At least one vent within 3 ft of each corner.
Minimum one access panel of 18″ wide × 24″ tall (3 sq ft total). Must be near water and electrical connections.
How to Calculate Your Vent Requirement
Here’s the actual math with a real example:
- Your home: 16 ft wide × 80 ft long = 1,280 sq ft of floor area
- Without vapor barrier: 1,280 ÷ 150 = 8.5 sq ft of net free vent area required
- With vapor barrier installed: 1,280 ÷ 1,500 = 0.85 sq ft of net free vent area required
A standard vent cover provides approximately 0.25 sq ft of net free area. So without a vapor barrier you’d need roughly 34 vents. With the vapor barrier installed you need just 4. This is why installing the vapor barrier first saves you significant money.
Access Panel Requirements
- Minimum width: 18 inches
- Minimum height: 24 inches
- Minimum total area: 3 square feet
- Location: within easy reach of your water shutoff valve and electrical connections
- Dryer vents and combustion air inlets must pass through the skirting to the exterior — never vent into the crawlspace
Winterization & Pest Proofing
Cold Climate Insulation
In northern climates, skirting alone is not enough to protect water lines from freezing. The standard multi-layer approach:
- Install 2-inch rigid foam insulation boards behind the skirting panels against the inside face — this adds significant R-value and acts as a secondary windbreak
- Keep foam boards from touching the ground — a gap of at least 1 inch prevents termite bridges and moisture wicking
- Wrap exposed water pipes with heat tape, cover with fiberglass insulation, and seal within a larger PVC pipe or insulated box
- Check your insulation every fall before freezing temperatures arrive — this is part of your complete mobile home winterizing checklist
Pest Proofing Your Skirting
Vinyl skirting alone will not stop determined rodents — they can chew through PVC. These steps significantly reduce pest intrusion:
- Around A/C lines and plumbing penetrations: Pack gaps with steel wool and seal with expanding foam. Rodents cannot chew through steel wool.
- At the bottom rail: If burrowing animals are an issue in your area, bury a heavy-duty galvanized wire mesh or rodent barrier panel 6 inches into the soil extending outward from the bottom track
- Inspect all vent covers and replace any with damaged screens — these are the easiest entry points for small animals
- If mice and raccoons are persistent, seriously consider upgrading to metal or concrete skirting — vinyl is simply not a barrier to determined rodents
DIY vs. Pro Cost Breakdown — 2026
| Material Type | DIY Total Cost | Professional Cost | Your Savings |
|---|---|---|---|
| Vinyl | $600 – $1,100 | $1,500 – $2,500 | $900 – $1,400 |
| Metal / Steel | $1,200 – $1,800 | $2,500 – $4,000 | $1,300 – $2,200 |
| Concrete | $3,000 – $4,500 | $6,000 – $10,000 | $3,000 – $5,500 |
| Faux Stone | $2,000 – $3,500 | $4,000 – $7,000 | $2,000 – $3,500 |
| Labor is 60% of pro cost | You keep that 60% | Paid to installer | $900–$5,500 saved |
Skirting is one of the highest-ROI exterior upgrades for a mobile home. Beyond the energy savings from reduced wind chill under the home, it protects your insulation and floor joists — which are the most expensive structural repairs a mobile home can need. See our complete mobile home remodel cost guide to understand how skirting fits into your total project budget.
When to hire a pro instead of DIYing:
- You’re installing concrete or DURASKIRT™ — these require two people and specific tools
- Your lot has extreme slope variations requiring complex height calculations
- Your park manager or local code requires permitted installation with inspection
- You’re preparing for FHA or VA financing where concrete underpinning may be required
Common Mistakes to Avoid
Skipping the Snap-Lock Punch on Cut Edges
Factory edges come pre-punched. Cut edges don’t. Every panel you cut must have tabs punched every 4 inches along the cut edge before installation. Without tabs the panel sits in the rail on friction alone and will pop out in the first windstorm.
Over-Tightening Fasteners on the Top Rail
PVC and metal expand and contract significantly with temperature — sometimes by a noticeable fraction of an inch on hot days. Fasteners must sit in the center of the pre-punched slots with a 1/16″ gap. Screws driven to the edge of the slot prevent movement and cause the entire rail to buckle or pop off the home in summer heat.
Installing Over Grass or Vegetation
Grass and organic matter enclosed under skirting continues to decompose, creating moisture, attracting insects, and causing ground settlement that pulls the bottom track out of alignment. Remove all vegetation to 12 inches before laying the vapor barrier and installing the bottom track.
Not Installing the Vapor Barrier
Skipping the 6-mil poly vapor barrier costs you twice. First, ground moisture rises into the crawlspace and rots floor joists — the most expensive repair in mobile home ownership. Second, without the barrier you need 10× more ventilation openings to meet HUD code, significantly increasing your material cost.
Cutting Panels Too Short in Cold Climates
Frozen ground expands upward — this is called frost heave. If your panels are cut tight to the ground in winter, spring thaw will push the bottom track up and buckle your panels. In freezing climates always cut panels to sit 3 inches above the ground, not the standard 1.5 inches.
Sealing the Crawlspace Completely
Never caulk or seal your vent openings thinking it will help with heating. A sealed crawlspace traps moisture and can allow gas to accumulate. Vents are a federal safety requirement. If you want better thermal performance, add rigid foam insulation behind the panels instead — that addresses heat loss without sealing the vents.
Forgetting the Access Panel Near Utilities
HUD requires at least one access opening of 18″ × 24″ positioned near your water shutoff and electrical connections. Some homeowners install skirting all the way around and then realize they have no way to access their plumbing in an emergency. Plan the access panel location before you start installing panels.
Measuring Height at Corners Only
On sloped lots, ground height changes every few feet. If you only measure at corners and cut all panels the same height, you’ll have gaps at the bottom in some areas and panels jammed into the soil in others. Do the full 16-inch height survey — it takes an extra 30 minutes and saves hours of frustration during installation.
Frequently Asked Questions
Ready to Skirt Your Home This Weekend?
Vinyl skirting is one of the most straightforward DIY projects a mobile home owner can tackle — and one of the highest-impact ones. It protects your plumbing, your insulation, your floor joists, and your energy bills all at once. The key is doing it right: install the vapor barrier first, do the full 16-inch height survey on sloped lots, use the snap-lock punch on every cut edge, and get the ventilation math right before you start placing panels.
Most homeowners who follow this sequence complete a single-wide in one day and a double-wide in a weekend — saving $900 to $1,400 in labor costs in the process.
Once your skirting is done, check our complete winterizing guide to protect everything underneath, and see our mobile home addition ideas for what to tackle next on the exterior.