Replacing windows on a mobile home sounds straightforward — until you realize your local hardware store doesn’t carry the right size, standard house windows don’t fit, and one wrong move with a pry bar can crease your aluminum siding permanently.
Mobile home windows are not a smaller version of regular windows. They’re built to entirely different specifications, governed by HUD federal codes, and designed for thinner wall cavities than you’ll find in any stick-built house. Get the wrong size or skip the butyl tape, and you’ll be dealing with water damage inside your walls within a season.
This guide covers everything you actually need to know: how to measure correctly, which windows to buy, the exact step-by-step installation process, and the mistakes that turn a $200 DIY job into a $1,500 repair. Whether you’re replacing one drafty jalousie window or doing the whole house, this is the guide you need.
Already wondering if your homeowner’s insurance covers the cost? Read this first: Does Home Insurance Cover Window Replacement?
Signs It’s Time to Replace Your Mobile Home Windows
Not every drafty window needs a full replacement. But some signs tell you the window is beyond saving — and waiting will only make the damage worse.
Condensation Between Panes
The seal is blown and insulating argon gas has escaped. There is no repair — the unit must be replaced.
Visible Daylight Around the Frame
A gap at the flange means water enters every rain. Check surrounding walls for soft spots before ordering.
Soft or Spongy Wall Below Window
Water intrusion rots particleboard fast. Fix damaged walls first — don’t cover rot with a new window.
Window Won’t Open or Lock
Could be a foundation issue, not the window. Check your home’s level first if multiple windows are binding.
Spiking Energy Bills
Old single-pane aluminum windows are the #1 energy leak in older mobile homes. Double-pane vinyl cuts heat transfer by 50%.
Jalousie Windows (Glass Louvers)
Standard in 1970s–80s mobile homes and impossible to seal properly. Replacement is always the right move.
Cracked or Broken Glass
A cracked pane in a double-pane unit will eventually fail the inner seal. Replace the whole unit, not just the glass.
If you’re planning a full exterior refresh, see our mobile home remodel ideas on a budget — windows are one of the highest-ROI upgrades you can make.
Section 2Mobile Home Window Sizes: The Chart You Need
Why “Rough Opening” Is the Only Measurement That Matters
Here’s the mistake that sends most DIYers back to the store: they measure the outside of the existing window frame and order a replacement that size. Wrong.
The measurement you need is the rough opening — the actual framed hole in the wall, not the window unit sitting inside it. Mobile home windows are manufactured approximately 1/2 inch smaller than the rough opening to allow for squaring, shimming, and sealant.
Note: Mobile home wall studs are 2×3 (2.5 inches deep) — shallower than the 2×4 or 2×6 studs in site-built homes. This is why standard residential windows won’t work — the mounting flange simply won’t reach the siding, leaving a gap for water intrusion.
Standard Mobile Home Window Size Chart
| Unit Size (W × H) | Rough Opening Required | Typical Location |
|---|---|---|
| 14″ × 21″ | 14.5″ × 21.5″ | Small bathrooms, closets |
| 14″ × 27″ | 14.5″ × 27.5″ | Bathrooms, hallways |
| 30″ × 60″ | 30.5″ × 60.5″ | Standard bedrooms |
| 36″ × 54″ | 36.5″ × 54.5″ | Living areas, kitchens |
| 36″ × 60″ | 36.5″ × 60.5″ | Master bedrooms |
| 46″ × 54″ | 46.5″ × 54.5″ | Large living room displays |
On window size codes: You’ll see codes like “3060” — this means 3 feet 0 inches wide × 6 feet 0 inches tall (36″ × 72″). In the manufactured housing market, always confirm whether the code refers to the unit size or the rough opening — it varies by manufacturer.
Window Styles Available for Mobile Homes
| Style | How It Works | Best For |
|---|---|---|
| Jalousie | Glass slats tilt open via a crank | Legacy homes only — replace immediately, impossible to seal |
| Single Hung | Bottom sash slides up, top is fixed | Most bedrooms and living areas — the standard replacement |
| Double Hung | Both sashes move vertically, tilt in for cleaning | High-ventilation areas, easier maintenance |
| Horizontal Slider | One or both sashes slide side to side | Wide openings where vertical space is limited |
| Awning | Hinged at top, opens outward | High-rain areas — ventilation without letting rain in |
Vinyl vs. Aluminum: What to Buy for a Mobile Home
For mobile homes in 2025, vinyl is the right choice in almost every situation. Here’s the side-by-side breakdown:
🏆 Vinyl Recommended
- Cuts heat transfer up to 50% with double-pane Low-E glass
- Never rusts, corrodes, or needs painting
- Natural flex handles chassis movement — won’t crack sealant
- Available in all three HUD thermal zone ratings
- Replacement parts widely available for years
⚠️ Aluminum Budget Only
- Highly conductive — icy in winter, radiates heat in summer
- Pits and corrodes fast in Florida and coastal environments
- Cheaper upfront but costs more long-term
- Only consider for seasonal or short-term-use homes
Is Low-E Glass Worth the Upgrade?
Yes — especially in Thermal Zones 1 and 2 (the South and Southeast). Low-E glass has a microscopically thin coating that reflects infrared heat while letting visible light through. In summer it keeps radiant heat outside; in winter it bounces interior heat back in. The energy savings typically pay back the cost difference within 2–4 years.
If you’re already insulating your mobile home or winterizing it, upgrading to Low-E double-pane at the same time is the most cost-effective move — you’re already doing the labor.
Best Window Brands for Mobile Homes
| Brand | Best For | Notes |
|---|---|---|
| Kinro | Best overall — most widely available | Market leader. Integrated J-channels and flush-mount flanges. Replacement parts easy to find. |
| Ply Gem | Premium upgrade | Heat-fusion welded corners. Energy Star compliant in all 50 states. |
| RELIABILT / Project Source | In-stock, budget option | Available at Lowe’s. Measure extra carefully — wider tolerances than Kinro. |
Tools & Materials Checklist
The difference between a window that lasts 20 years and one that leaks in 18 months comes down to two things: the butyl tape and the sealant. Don’t skip or substitute either one.
| Item | Why You Need It | Get It Here |
|---|---|---|
| Tape measure | Measuring rough opening — triple-check before ordering | Any hardware store |
| Carpenter’s level | Unlevel windows won’t operate or close properly | Any hardware store |
| Carpenter’s square | Confirms 90° corners before final fastening | Any hardware store |
| Cordless drill + bits | Driving screws through mounting flange into studs | Any hardware store |
| Small pry bar | Removing old window — careful not to crease the siding | Any hardware store |
| Utility knife + putty knife | Scoring old caulk and scraping the opening completely clean | Any hardware store |
| Wire/steel brush | Removing every trace of old butyl tape residue | Any hardware store |
| Shims | Leveling the window when the rough opening is slightly out of square | Any hardware store |
| Butyl Putty Tape (3/4″ × 1/8″) | Primary moisture gasket — applied to back of mounting flange. Never skip this. | 🛒 Amazon |
| OSI Quad Max Sealant | SMP hybrid with 5× stretch for chassis flex. Do NOT use standard silicone. | 🛒 Amazon |
| Great Stuff Windows & Doors Foam | Low-expansion only — standard high-expansion foam bows vinyl frames | 🛒 Amazon |
| Caulk gun | Applying the exterior OSI bead cleanly and evenly | Any hardware store |
How to Replace Mobile Home Windows: Step-by-Step
Budget 2–3 hours per window as an experienced DIYer. For your first window, allow 3–4 hours. Work on one window at a time — never leave an open hole in your wall overnight.
Measure Precisely and Order the Right Window
Do this before anything else. Ordering the wrong size is the most expensive mistake you can make.
- Remove the interior trim casing to expose the raw framed opening
- Measure the rough opening width at top, middle, and bottom — note all three
- Measure the rough opening height at left, center, and right — note all three
- Use the smallest width and smallest height to order your unit
- Measure diagonals corner to corner — within 1/8″ means the opening is square
- Order your window unit 1/2″ smaller than the rough opening in each dimension
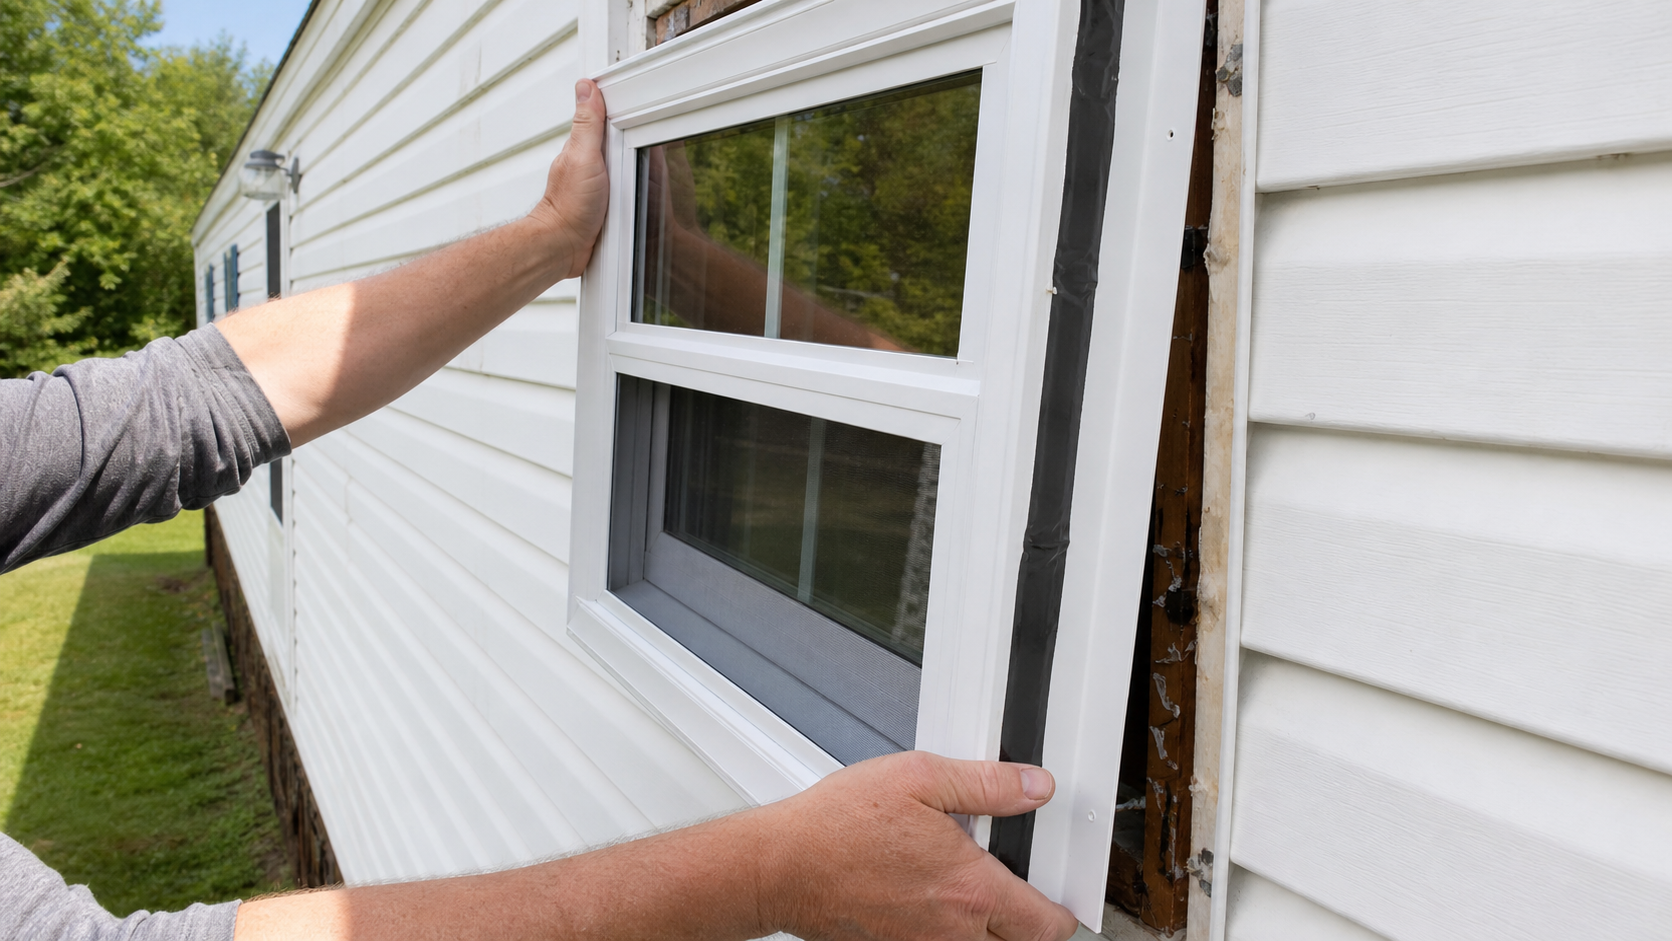
Remove the Old Window
- From the exterior, locate the screws in the mounting flange — often hidden under old caulk. Run your knife along the flange edge to expose them
- If your home has lap siding, you may need to carefully remove the bottom course above the window to access the top flange screws
- Remove all screws from the mounting flange
- Push the unit outward from the interior to break the old sealant bond
- Use a small pry bar on the exterior to work the unit out — move slowly. Aluminum siding creases permanently and any bend will be visible forever
Clean the Opening Completely
Tedious but critical. New sealants will not bond to old butyl residue, caulk, or oxidized metal.
- Scrape off all old putty tape and caulk from the siding around the opening with a putty knife
- Use a steel brush to scrub the remaining residue until you have a clean, bare surface
- Inspect the rough opening framing closely. Soft, spongy, or discolored wood means rot — address it now before proceeding
- Dust off and allow the opening to dry completely before the next step
Apply Butyl Tape and Set the Window
The butyl tape is your moisture barrier — this is the most important material in the whole installation.
- Apply a continuous run of 3/4″ × 1/8″ butyl putty tape along the back of the window’s mounting flange — the side that presses against the siding
- Apply a double layer of butyl at the top flange — water runs down, so the top takes the most pressure
- From the exterior, set the window unit into the opening. Center it left to right
- Place a level on the bottom sill. Slide a shim under the low side until it reads perfectly level
- Drive one screw into the middle of each side flange — snug only, not fully tight yet
- Use your carpenter’s square on interior corners to confirm the window is square. Adjust shims if needed
- Once square and level, drive in all remaining screws from center outward. Tighten until butyl tape just begins to squeeze out at the edges — that’s your seal confirming it’s set
Weatherproof and Finish
- Foam the interior gap: Inject low-expansion foam (Great Stuff Windows & Doors — yellow can) into the gap between the window frame and rough opening studs. Fill but don’t over-fill. Let cure fully, then trim flush with a utility knife
- Exterior sealant bead: Apply a continuous bead of OSI Quad Max along the top and both sides of the window where the flange meets the siding. No gaps — gaps become leaks
- Leave the bottom open: Do NOT caulk the bottom flange edge. This allows moisture to escape through the weep holes. Sealing the bottom traps water inside your wall
- Reinstall interior trim and nail the casing back over the window frame
- Test operation: Open and close both sashes. They should slide smoothly with no binding. Test the lock. If sashes won’t meet squarely, loosen screws slightly and re-square
HUD Codes, Wind Zones, and Egress Rules
Mobile home windows are not just a DIY decision — they’re a federal compliance issue. The HUD Code (24 CFR 3280) governs everything from thermal performance to wind load requirements. Here’s what you need to know before you order.
HUD Thermal Zones & U-Factor Requirements
The U-factor measures how quickly a window transfers heat. Lower is better. Your replacement must meet the U-factor for your zone.
| HUD Thermal Zone | States Included | Max U-Factor |
|---|---|---|
| Zone 1 | Deep South — FL, TX, LA, GA | 0.35 or lower |
| Zone 2 | Central — AZ, NC, TN, KY and surrounding | 0.35 or lower |
| Zone 3 | North — All remaining states | 0.34 or lower |
HUD Wind Zones
- Wind Zone I: Rated for 70 mph — most of the interior US
- Wind Zone II: Rated for 100 mph — inland Gulf Coast, parts of the Southeast
- Wind Zone III: Rated for 110 mph — coastal Florida, Louisiana, and HVHZ regions
Egress Requirements for Bedroom Windows
Federal law requires every bedroom to have at least one window that allows emergency escape in a fire. If you’re replacing a bedroom window, your new unit must meet all of these:
| Requirement | Minimum |
|---|---|
| Net clear opening area | 5.0 square feet |
| Clear opening height | 24 inches |
| Clear opening width | 20 inches |
| Window sill height from floor | No more than 36 inches |
Failing egress compliance in a bedroom is a serious safety violation — and insurance companies can use it to deny claims after a fire. Check your homeowner’s insurance coverage for windows while you’re at it.
Do You Need a Permit?
- In most states, a direct same-size window swap does not require a permit
- Florida HVHZ (Miami-Dade and Broward counties) — permits and inspections required for all window work, no exceptions
- Enlarging an opening or adding a new window always requires a permit
- Some HUD-regulated communities require work orders filed with the park manager
DIY vs. Hiring a Pro: 2025–2026 Cost Breakdown
Window replacement is one of the more accessible DIY jobs on a mobile home — no special licenses needed, the tools are basic, and one window takes an afternoon. The math strongly favors DIY if you have the time.
| Cost Item | DIY | Professional Install |
|---|---|---|
| Window unit (vinyl, double-pane) | $150 – $350 | $250 – $500 (marked up) |
| Butyl tape, sealant, foam | $20 – $35 | Included in labor |
| Labor | $0 (your time) | $100 – $300 per window |
| Old window disposal | $0 – $20 | Typically included |
| Total per window | $170 – $405 | $350 – $800 |
For a whole-house replacement (6–10 windows), DIY savings range from $1,200 to $4,000. See our full mobile home remodel cost guide to see how windows fit into your total project budget.
When to hire a pro instead:
- You find rot or structural damage in the rough opening framing
- You’re in a Florida HVHZ zone requiring permitted, inspected installation
- You’re enlarging a window opening (requires structural knowledge)
- You want the manufacturer’s installation warranty to stay valid
8 Common Mistakes to Avoid
Measuring the Window, Not the Rough Opening
The single most common mistake. Measure the framed hole in the wall — not the window sitting inside it. These are different dimensions. One wrong measurement equals a return trip to the store and a week’s delay.
Using a Standard Residential Window
A site-built window’s flange is designed for 2×4 or 2×6 walls. In a mobile home’s 2×3 wall, the flange doesn’t reach the siding. Water gets in immediately. Always use windows engineered specifically for manufactured housing.
Skipping the Butyl Tape
Some DIYers go straight to caulk thinking it’s the same thing. It’s not. Butyl putty tape is a compression gasket that creates an immediate, conforming moisture seal when the flange presses against the siding. Caulk alone is not a substitute.
Caulking the Bottom of the Window
Caulk the top and sides only. The bottom edge must stay open. Mobile home windows have weep holes designed to drain water that gets behind the flange. Sealing the bottom traps that water inside your wall where it causes rot.
Using High-Expansion Spray Foam
Standard Great Stuff (orange can) is high-expansion. It will bow a vinyl frame and prevent the sashes from operating. Use only the Windows & Doors formula (yellow can) which expands minimally.
Over-Tightening Mounting Screws
Vinyl is flexible by design. Drive screws until firm — not until the frame visibly deflects inward. A bowed frame means jammed sashes and a window that won’t lock.
Replacing Windows Before Checking Your Level
If multiple windows are sticking or won’t close properly, the problem is likely a foundation that’s settled unevenly — not the windows. Check your home’s level first. Replacing windows won’t fix anything if the frame is racked.
Installing Over Rot or Moisture Damage
If you remove the old window and find soft, dark, or spongy framing — stop. Cut out the damaged wood and sister in new pressure-treated lumber before installing the new window. Covering up rot accelerates the damage dramatically.
Frequently Asked Questions
Ready to Get Started?
Replacing a mobile home window is one of the most rewarding DIY upgrades you can make — it directly impacts your energy bills, comfort, and resale value. The key is doing it right: measure the rough opening (not the window), use butyl tape as your primary moisture gasket, seal with OSI Quad Max on three sides only, and buy windows built specifically for manufactured housing.
One window can be done in a Saturday afternoon. A whole-house upgrade spread over a few weekends can save you $1,200–$4,000 in labor and hundreds per year in energy costs.
Looking for more upgrades? See our complete mobile home remodel ideas on a budget — windows pair especially well with updated insulation, new flooring, and a kitchen refresh for maximum impact.